
Health & Fitness
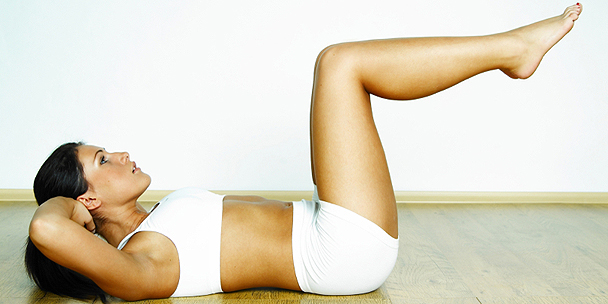
The 20-minute body makeover
Not ready to slip into that sexy summer dress yet? Follow these steps and you'll be toned in no time!
Find the bikini that suits your body shape!
Sweet, sweet summer. There’s just nothing like it! It’s the time for soaking up those precious summer rays (well protected with sunscreen, of course!), sitting out on patios with friends as the fresh summer air cools your skin, and slipping into sleek, sexy summer dresses that show off your best assets! Uh-oh! Have those best assets turned a little, ahem, soft over the winter? No matter – an easy regimen at the gym can have you back in top form in no time! We checked in with David Peereboom at Aiyoku a Cardio Lounge in Toronto for quick and easy exercises that’ll turn that flab into ab-fab. Best of all, these routines only take 20 minutes each!
Before you get started
“We are bombarded with so many different exercises, sometimes we forget that there are basic fundamentals we have to practice with each exercise,” says David. Some key things to remember when doing your exercises are:
Warm-up. Make sure to warm up at least 5 minutes before exercising. This will give your body the opportunity to get your muscles more pliable for work, allow for more synovial fluid for your joints to have better range of motion, allow for your body to produce more oxygen that your body needs in order for it to work better, core temperature of your body to increase for those intense workouts and most of all, mentally get focused on the workout ahead of you.
Breathe. Make sure to breathe in through your nose when the weight comes down with gravity and breathe out through your mouth when pushing the weight against gravity. You don’t want your muscles to seize.
Stand tall and proud at all times! At no given point should you ever look defeated. Your shoulders should always be pulled back, back in neutral position, chest up and abs tight. This will always allow for better concentrated muscle contraction, especially when working your back, not to mention by practicing this in your everyday life, this will possibly add an inch or two to your height, and lose an inch in your waist by constantly working your abs. Alignment. Exercise is all about alignment. If you don’t pay attention to your alignment when exercising, you will possibly injure yourself and/or make a bad posture worse and is a sure way to not isolate proper muscles that you’re trying to work.
Stretch. Do not stretch before, during or right after exercise. Try to get your stretches in on your off day, where your muscles have had a chance to heal the small tears in the muscle fiber so that you don’t cause bigger tares, which in turn cause more lactic acid to build up and you will be even more sore than usual.
Cool down. Make sure to cool down after the workout for about 5 minutes. This will allow for you to break down some of the lactic acid build up in your muscle and allow for your body to dispose of the extra oxygen your body created, which you no longer need.
“These circuits should be done 30 seconds per exercise, working your way up to 1 min, with 3 deep breaths in between,’ says David. ‘After the first set, take a break for 30 seconds, then go back to the beginning of the circuit and repeat two more times.”
Gettin’ to the good stuff
Whatever your problem area, there are simple exercises to target and tone them. Here, we focus on legs, arms and abs. David dishes up the straight goods on getting these areas toned for summer, with 20-minute circuits for each.
20-minute leg circuit on the next page…
The perfect beach body: The beach bunny’s dilemma
Fitness funk: Transform your body into whatever you want it to be
Check out our spring fitness special!
20-minute leg circuit
1. Dumbbell back lunge with knee up
• Hold the dumbbells beside you with palms in, feet hip distance apart, both feet and knee facing the front.
• Take a giant step back with the right foot. Make sure to land on the ball of your right foot, heel off the ground. (Both knee and feet should be facing the front) • Drop the right knee down almost 1 inch off the floor.
• Make sure to not let the left knee pass your left toe.
• Be sure to have your hips, knee and ankle are place in a straight line coming down your body. You should not see the right side of your pelvis drop, nor should your pelvis rotate out.
• Push up with your right leg and bring your right knee up in front to 90 degrees at the knees.
• Repeat same leg and change legs.
2. One leg squat
• Stand with right knee up to 90 degrees at the knees in front, arms in front for counterbalance and chin slightly up. (If you look down, your body will follow where your head is looking). NOTE: When you bring your knee up, do not let your hip drop.
• Slowly squat down with the left leg, keeping the right knee up.
• Do not tuck your glutes in. Keep your spine in a neutral position.
• Left knee should not be passing your toe, keeping your hip, knee and ankle in a straight line down your body.
• Slowly push back up to start position and repeat.
• Repeat for the right leg.
3. Dumbbell dead lift
• Hold your dumbbell in front of your body with your arms straight, dumbbells touching each other. Feet should be hip distance apart, feet and knees facing the front.
• Keep your spine in neutral position, chin slightly up, and slowly squat down to 90 degrees at the knees with the weight still in front of your body.
• Knees should not pass your toes. Hips, knees and ankle should be in a straight line down your body.
• Slowly squeeze your glutes and legs to come back up to the starting position.
• NOTE: Do not lift the weight with your arms. Keep the weight close to your body at all times and do not lock your knees between reps.
4. One leg dumbbell pick-up
• Stand on right leg, left leg bent back, dumbbell in your left hand and right arm extended out in front to counterbalance. Do not let your pelvis drop when you lift the left leg off the floor.
• Slowly come down to a squat position to about 45 degree at the right knee. Same time, lower the dumbbell with your left arm in front as if to put the weight down. Your right leg should not be overlapping behind your Left leg.
• Just before touching the ground with your dumbbell, slowly bring the weight back up and stand up with the right leg and go back up to start position. • Repeat with same leg, and then switch to the left leg, with the dumbbell in your right hand. 5. Walking dumbbell lunge with rear leg extension
• Stand with feet straight ahead, weights by your side.
• Take a giant step forward with your right foot (heel-to-toe landing) and slowly drop the back knee down almost to the floor.
• Do not twist out the left foot and come right up with left foot heel up onto the ball of your foot.
• Do not let your pelvis drop. Hips, knee and ankle should be in line down your body. (Right knee should be facing the same direction as your right foot.)
• Pull up your body with your right leg, maintaining alignment and extend the left leg off the floor behind you. Make sure to lean slightly forward, as to not hyperextend the lower back, and keep your left leg flexed straight, using the left glute to pull the left leg up.
• Bring your left leg back down with your feet together and continue traveling forward, alternating your steps.
20-minute arm circuit on the next page…
Fast fitness: Get your best body in 30-minutes
How to look good naked: 5 steps
Tush control: How to get a bootylicious backside!
Find out which celebrity diet matches your personality!
20-minute arm circuit
1. Seated dumbbell shoulder press
• Sit with your feet flat on the floor, knees at 90 degrees.
• Start with dumbbell over your head, arms bent at 90 degrees at the elbows, palms facing the front.
• Keep your back in neutral position as you push the dumbbells up until arms are completely straight, shoulders down (do not shrug shoulders), palms facing front.
• Bring the dumbbells back down to start position, and repeat. (Do not let the elbows drop below the shoulder level.)
2. Standing concentrated dumbbell curl
• With right leg up on a riser, bench or chair, place right arm directly on the inside of your thigh, right above the knee.
• Lift the weight by bending your arms at the elbows, wrists locked, and concentrate on the contraction of the bicep.
• Try to keep your shoulders back as you pull the weight up.
• Slowly lower the weight until arm is almost straight, but do not release the contraction of the bicep.
• Repeat then switch arm.
3. Standing bent over dumbbell kickbacks
• Stand with feet hip distance apart
• Bend just at the hip down to 45 degrees at the hip. Keep your back in neutral alignment.
• Bring your elbows up behind you, squeezing the arm by your sides, elbows at 90 degrees.
• Extend arms straight with the back of the hand, not the front.
• Bring weight back to start position.
• Repeat.
4. Standing dumbbell iron-t
• Stand with feet hip distance apart, knees slightly bent.
• Raise the dumbbell laterally, slightly higher then shoulder height. Keep palms down.
• Bring the weight to the front of the body, back out to lateral raise, then back down to your side.
• NOTE: Do not relax your shoulders between reps.
5. Standing dumbbell reverse curl
• Stand with feet hip distance apart, knees slightly bent, dumbbell in front of your body with palms facing in.
• Curl the weight without allowing the elbows move back and forth.
• Do not rock your body back and forth to use momentum to lift the weight.
• Reverse the movement by straightening the arms, but do not release the tension in your biceps and repeat.
6. Supine dumbbell triceps extension
• Lie on your back with your knees bent, feet flat on the floor.
• Extend arms towards the ceiling, keep shoulders squeezed back, palms facing each other, elbows facing your feet.
• Lower the weight to the side of your head, elbows not moving positions, elbows still facing the feet, close together.
• Extend the arm, but resist moving the elbows or pulling elbows apart.
• Repeat.
20-minute ab circuit on the next page…
Running mates: Racy picks for getting back on track
Survival of the fittest: Get in shape by playing outdoors
Forget the treadmill, check out these hot ways to get in shape!
20-minute ab circuit
NOTE: The key to great abs is to do them slowly, not letting your contraction go between reps and exhale when exerting (crunching).
1. Bicycle with oblique twist
• Start with hands behind your head, feet off the floor, knees bent.
• Extend left leg straight, slightly above the floor. At the same time, bring left elbow toward the bent right knee, keeping the right arm on the floor.
• Resist pulling with your arms and focus on your oblique to do all the work.
• Back down to start position without losing contraction and repeat, alternating sides.
2. Prone plank
• Lying face down, start the plank by tightening your abs to support the lower back.
• Making sure your elbows are in a position where when you go up on to your elbows, your elbows are beneath the shoulder, supporting your weight.
• Your elbows should be at 90 degrees.
• Do not let your hips drop down, nor should they be sticking up.
• Do not let your head hang down, nor should you look up.
• Do not allow your body to sink into your shoulders. You want to support your weight as much as possible.
• Hold this position.
3. Crunch with reverse crunch
• Lie with knees bent, arms behind your head, supporting your neck.
• Crunch up with your upper body bending across the chest area. Resist pulling with your arms and focus on pulling with your abs.
• At the same time, bring knees in to your chest.
• Do not pelvic tilt. Back should be in neutral position.
• Bring your feet and upper body back down to the floor without releasing the contraction and repeat movement.
4. Side plank
• Put your feet on top of each other, right elbow should be right under the shoulder to support the weight as you do this move.
• Keep your head in neutral position and do not let your body sink into your shoulder.
• Your shoulders, hips, knees and ankle should be lined up in a straight line.
• Hips should not be sinking.
• Hold, then repeat on your left side.
5. Seated knee tucks
• Sit with both knees tucked into your chest, hands behind your body on the floor for counterbalance.
• Extend right leg straight and bring back to chest as you crunch your abs.
• Repeat, alternating legs.
Side oblique crunch
• Lie on the left side of your body. Right arm should be bent behind your head, left arm on the floor for balance, and feet straight on top of each other. Keeping feet together, crunch your body up without twisting and bring both legs up off the floor.
• Bring your body and legs back down. Repeat, then switch sides.
• NOTE: Shoulders, hips, knees and ankles should be in a straight line. Body does not twist.
Read more:
The antioxidant diet: Need a boost in your diet?
Fitness facts: Our top 4 fit myths
Core conscious 5 exercises aimed at toning your tummy
Newsletter
Join our mailing list for the latest and biggest in fashion trends, beauty, culture and celebrity.

Read Next

Beauty
Dyson Just Launched Its Most Intelligent Hair Dryer Yet
Get ready to upgrade your blowout game.

Fashion
Meredith Shaw and Penn Have Created a Plus-Size Summer Dress Collection That "Feels Like Candy"
Morning Show Host Meredith Shaw wants you to "see your summer" in this curated collection for sizes 14-32.
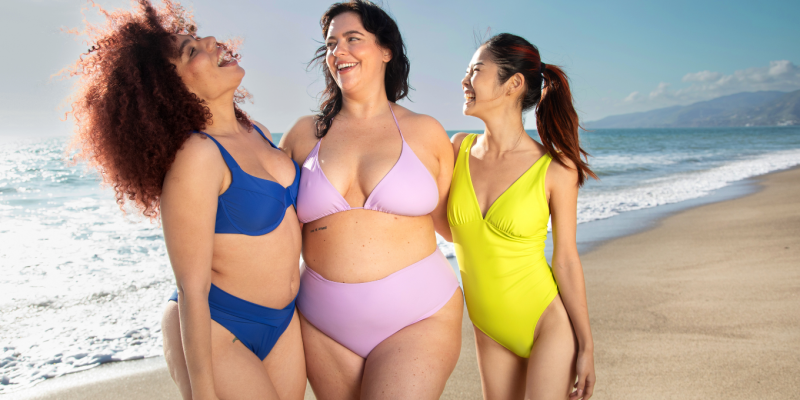
Beauty
Summer Prep: How to Feel Confident in Your Swimsuit
New Size-Inclusive Swimwear: Gillette Venus partners with The Saltwater Collective to Launch a Collection for Any Body